Swirly Wirly Peace Offering
I am a very very bad blogger for not posting for so long! My only excuse is that
I have a rather large project on at the minute and I have been so very busy
trying to organise and arrange things for it that I have neglected my blogging
duties. I’m set to be busy with it for the next 7 to 8 weeks so I apologise in
advance if I neglect my duties again! (All will become clear at a later date, I
promise!)
Anyway, to make up for my neglect here is a fancy new blog post.......what? I can't buy your forgiveness with a blog post?!......Maybe a cake recipe will change your mind?
Meet the Swirly Wirly Cake (my choice in name and I'm sticking to it!):
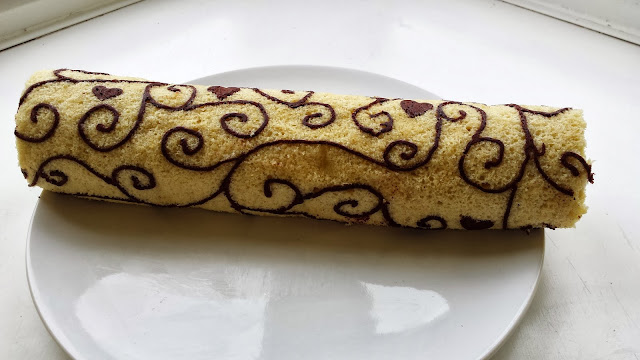
Pretty fancy, huh?
The inspiration for it came from Pinterest (follow me here!), and after a bit of fancyfootwork piping work my version of the Swirly Wirly Cake was born baked.
Here's the recipe:
For the Swirly bits:
1 egg white
15 g unsweetened cocoa powder
25 g flour
30 g sugar
30 g butter
For the Swiss roll:
4 eggs
120 g flour
120 g sugar
1 pinch of salt
For the swirly bits its pretty much a "whack it all in a bowl and mix" job. I like to keep it easy!

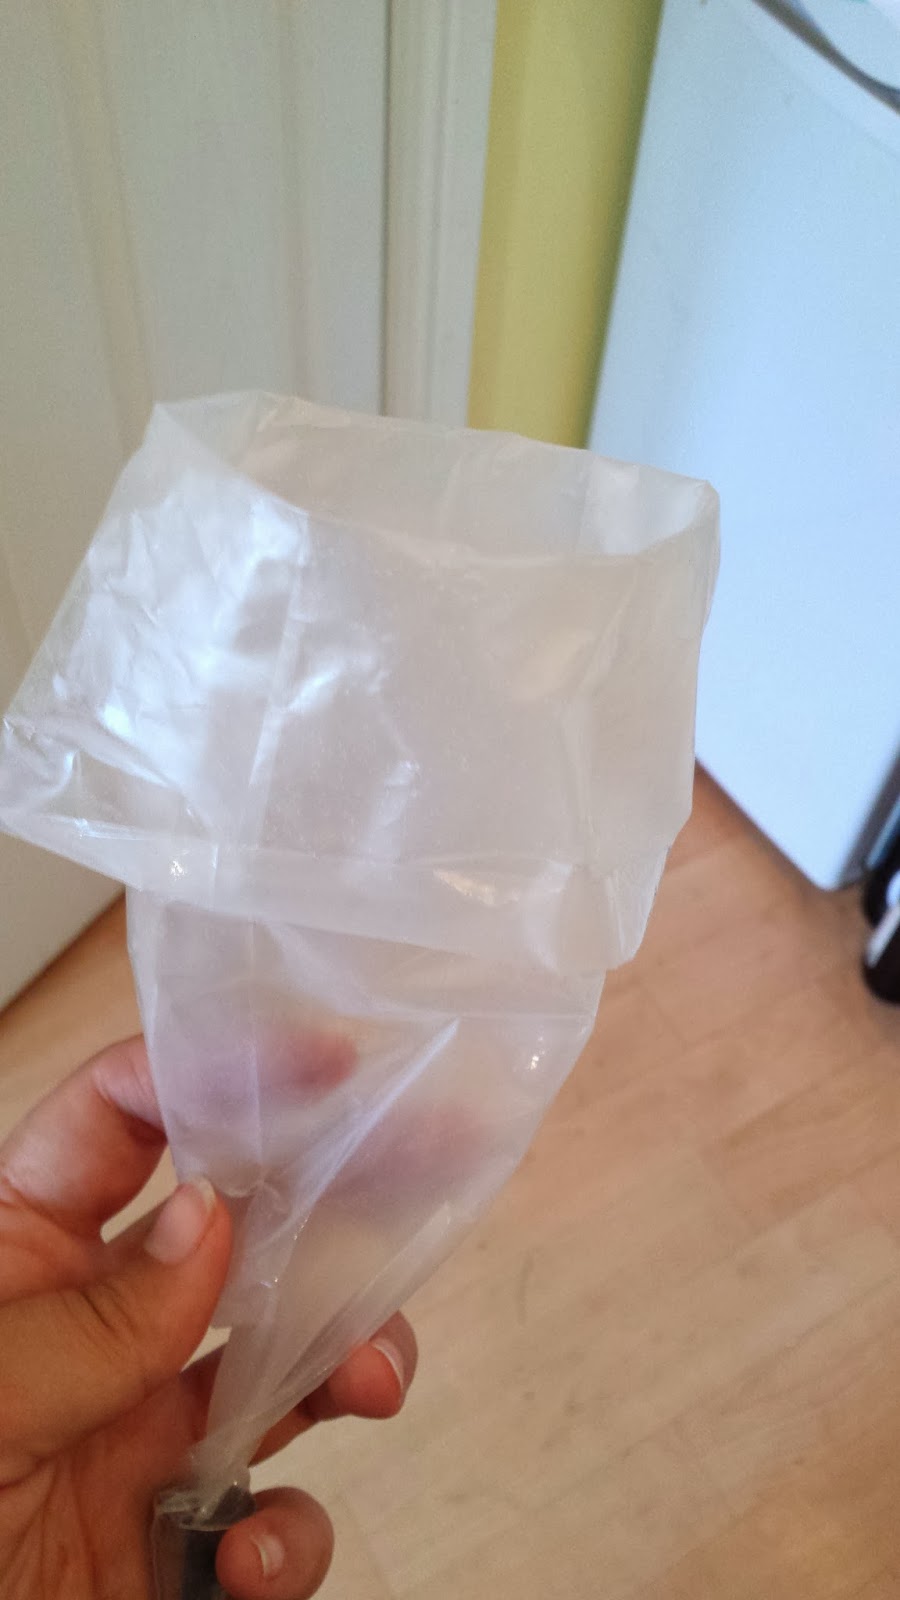
The paste will be quite thick, which is perfect because it needs to hold its shape. Get a piping bag and a fairly thin nozzle, assemble, and put your paste in the bag. I always twist the bag just above the nozzle to avoid anything falling out, you shouldn't need to for this recipe but it's a good habit to get into!

Pop your bag into the fridge to chill out a little. While it's chilling you can draw out your pattern. Do this on some greaseproof paper, remember that what ever design you want to do will need o be done backwards as you'll be turning the paper over to pipe onto......nobody wants to taste pencil in their cake!

Now you have your pattern flip the greaseproof paper over and pipe your paste on the opposite side to the one you drew on and follow your pattern.


It's time to look at your sponge mix. I followed the following recipe however I am going to go away and have a fiddle with it because mine came out a bit dry and coarse.
"Preheat the oven to 170 º C/375F . Place the eggs and sugar into a bowl and whisk until very light, fluffy and thickened. Sift the flour over the mixture and fold in carefully." Recipe is courtesy of La Receta de la Felicidad
Now it's time for the best bit! Take your pattern out of the freezer and place it on an already lined Swiss roll tin, make sure the patterned side is up.

Once it's baked and ready to come out you will need to roll it. (It get a little hot, I won't lie!) I just rolled it in the greaseproof paper it was lined with . Press a line into one of the short edges of the sponge about 1cm in from the edge. Tuck it in tight and tightly roll the whole thing up. Once it's rolled, wrap it up in another layer of greaseproof and tightly twist the edges. Allow the sponge to cool in this position.

As soon as it's cooled unroll it gently, taking care to slowly peel away from the sponge so you don't tear it or pull the pattern off, then fill with whatever you want, I used whipped double cream with raspberries. There you have it; your own little (but simple) masterpiece. This cake looks impressive and gets a lot of "wows". And who doesn't love that?!


Anyway, to make up for my neglect here is a fancy new blog post.......what? I can't buy your forgiveness with a blog post?!......Maybe a cake recipe will change your mind?
Meet the Swirly Wirly Cake (my choice in name and I'm sticking to it!):

Pretty fancy, huh?
The inspiration for it came from Pinterest (follow me here!), and after a bit of fancy
Here's the recipe:
For the Swirly bits:
1 egg white
15 g unsweetened cocoa powder
25 g flour
30 g sugar
30 g butter
For the Swiss roll:
4 eggs
120 g flour
120 g sugar
1 pinch of salt
For the swirly bits its pretty much a "whack it all in a bowl and mix" job. I like to keep it easy!

The paste will be quite thick, which is perfect because it needs to hold its shape. Get a piping bag and a fairly thin nozzle, assemble, and put your paste in the bag. I always twist the bag just above the nozzle to avoid anything falling out, you shouldn't need to for this recipe but it's a good habit to get into!
Pop your bag into the fridge to chill out a little. While it's chilling you can draw out your pattern. Do this on some greaseproof paper, remember that what ever design you want to do will need o be done backwards as you'll be turning the paper over to pipe onto......nobody wants to taste pencil in their cake!


One you're all piped put your new fancy design in the freezer to set.

It's time to look at your sponge mix. I followed the following recipe however I am going to go away and have a fiddle with it because mine came out a bit dry and coarse.
"Preheat the oven to 170 º C/375F . Place the eggs and sugar into a bowl and whisk until very light, fluffy and thickened. Sift the flour over the mixture and fold in carefully." Recipe is courtesy of La Receta de la Felicidad
Now it's time for the best bit! Take your pattern out of the freezer and place it on an already lined Swiss roll tin, make sure the patterned side is up.
Pour the mixture on top of the paste then pop the whole thing in the oven for 10 to 15 minutes.....oven depending.

Once it's baked and ready to come out you will need to roll it. (It get a little hot, I won't lie!) I just rolled it in the greaseproof paper it was lined with . Press a line into one of the short edges of the sponge about 1cm in from the edge. Tuck it in tight and tightly roll the whole thing up. Once it's rolled, wrap it up in another layer of greaseproof and tightly twist the edges. Allow the sponge to cool in this position.

As soon as it's cooled unroll it gently, taking care to slowly peel away from the sponge so you don't tear it or pull the pattern off, then fill with whatever you want, I used whipped double cream with raspberries. There you have it; your own little (but simple) masterpiece. This cake looks impressive and gets a lot of "wows". And who doesn't love that?!


Oh, and I have done my September Photo challenge! I am just trying to get all the photos together and sort through them so watch this space!


Comments
Post a Comment